Yoga For Back Pain — Part 2

Improving mobility of the lower body is also important in controlling back pain.

Tightness in large muscles in the lower body are also very frequent causes of in low back pain. The most common culprits are the hamstrings (back of your thigh) and the hip flexor, a deep muscle in the front of your hip that attaches to the low back. The hip flexor can causes increased curve in the low back  and pulls your pelvis forward if it is tight. The hamstrings often cause a flattening of the curve in the low back and tilt the pelvis backwards when it is tight. This creates abnormal stresses upon the spine.

Again review detailed instruction on each pose at www.yogajournal.com

  1. Hip Flexor Stretching: Stretch should be felt in front of hip and thigh of the back leg.

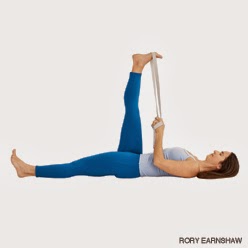
  2. Hamstring stretching: There are many forms of hamstring stretching. Performing stretching on one’s back is the safest place to begin because the back is supported, minimizing stress on the spine.
Lastly, yoga is beneficial in stabilizing the core by increasing abdominal awareness with the use of breath work. Breath assists the expansion and contraction of the abdominal cavity which houses the abdominal and lumbar musculature. So, as we deepen our breath in and use our breath to propel our motion it stimulates the activation of these muscles. Yoga teaches us to draw our attention to our core and move mindfully from our center to build strength and stability in the spine.

Standing and balance poses also encourage simultaneous contraction of muscles in the front and back of the body. This teaches the core to work in the ways that we move on a daily basis. Therefore, the combination of awareness, breath, and balance poses make yoga endurance work out for our core.

This article highlights only some of the ways yoga can assist in treating low back pain. However, it is important to note that not all back pain is the same. Different diagnoses have different causes and aggravating factors. It is important understand your limitations before initiating a yoga program. Yoga is not appropriate for treating severe back pain or acute aggravation of back pain. Yoga is a great way to manage low back pain that has been diagnosed and controlled. Please consult your physical therapist or primary care physician before you begin. Namaste.

If you have any questions or are interested in more information on this topic check out www.trucarept.com or contact Ericka at (401) 884-9541

Post contributed by: Ericka Fryburg MPT

Yoga for Back Pain — Part 1

Low back pain is one of the most common reasons people seek out physical therapy care, and clients often ask if yoga can improve their low back symptoms. Therefore, as part of National Yoga Month this September, Tru-Care Physical Therapy would like to share some insight why yoga is often considered effective in the treatment of back pain.

Yoga has many benefits that assist in the management of low back pain that include improving posture, increasing flexibility, and stabilizing the spine by increasing core strength.

Part I

First, and most importantly, yoga can help improve postural imbalances that lead to low back pain. You can increase body awareness with basic poses. The most basic of all standing yoga poses or “asanas” is Tadasana or Mountain pose. At first glance it may seem like you are simply standing. However, it is the attention to “how” you are standing that makes it so important. For guided instruction on how to do mindful Tadasana pose see the previous post on standing posture from May 2013.

The next benefit of yoga is increasing flexibility of the spine and extremities. The main components of spinal motion are flexion (forward bending), extension (backwards bending), rotation (twisting), and lateral flexion (side bending). Yoga asanas address all of the motions of the spine through poses of various intensity and difficulty. Below are some gentle yoga poses that address each of these motions.

When performing these poses listen to your body so you do not cause pain. Take slow, deep breaths and try to increase your motions. The pictures below are taken from www.yogajournal.com which is a great reference for all things yoga. The Yoga Journal site also provides step by step instructions to safely perform each of these poses. 

  1. Cow: improves back bending (extension) of the spine.

    As you inhale, lift your sitting bones and chest toward the ceiling, allowing your belly to sink toward the floor. Lift your head to look straight forward.

    Exhale, coming back to neutral “tabletop” position on your hands
     and knees. Repeat 10 to 20 times.

  2. Cat: Improves forward bending (flexion) of the spine.

    As you exhale, round your spine toward the ceiling, making sure to
    keep your shoulders and knees in position. Release your head
     toward the floor, but don’t force your chin to your chest.

    * Cat and cow can be held as isolated stretches for 30 secs each (2-3 reps)or you can move between the two poses with each breath doing 10-15 reps of each.

  3. Child’s Pose Stretch: improves lumbar flexion. It is also a great place to begin side bending by walking both hands to one side creating length in the side of the body.

    Begin kneeling and sit onto your heels.

    Reach arms forward in front of you and lower your head toward the floor.

    Sustain the position 30-90 secs relaxing into the pose with each breath.

  4. Supine Spinal Twist: improves rotation of the spine. Performing twists lying on your back is the safest place to begin twisting because the back is supported, minimizing stress on the spine.          

    Begin on your back with arms to the sides.

    Turn your head to the right.

    Bring your right knee up and across your left leg<.

    Let your right leg rest across the left stretching towards the floor.

    Child’s pose and spinal twist can be performed for 30-60 secs. Attend to your breath as you slowly let your low back stretch.

For more detailed instruction in performing these yoga poses you can again refer to www.yogajournal.com

Next post will instruct in 2 hip stretches that will effect the low back, as well as more information on breath and balance. If you have any questions or are interested in more information on this topic check out www.trucarept.com or contact Ericka at (401) 884-9541

Post contributed by: Ericka Fryburg MPT

Weight Lifter’s Elbow??

Weight lifter’s elbow? Never heard of it! How about Mommy’s elbow? Carpenter’s elbow? Typer’s elbow? Salesman elbow? ….. No?

Perhaps Tennis or Golfer’s elbow? Yes I am sure that most of you have heard of these 2 issues. But all the others are the same problem. Any of the options above create similar stress on the elbow as does tennis or golf. Mom tries to do all her tasks one handed while keeping hold of a crying child; Joe swings a hammer or holds a drill overhead for hours at a time; Jean decides that doing 3 sets of lateral raises with increased weight should be OK; and Fred sits at his computer programming all day long with fingers flying across the keys.

All of these tasks stress the forearm muscles. These muscles actually are responsible for motions and movements at the wrist. The common extensors are the muscles that pull your wrist up and they attach to the outside condyle (bony area) of your elbow and the common flexors attach to the inside condyle and they pull our wrist down. They also control the movements of the fingers for opening and closing the hand.

So how does the elbow get injured in these activities? As the muscles contract and hold that drill steady the muscle puts strain on the tendon where it inserts into the elbow. This force on the bony anchor can lead to microscopic trauma over time. Little tears that our body heals without difficulty. But the healing can lead to decreased flexibility and strength. As time goes by the injury progresses and the tendon begins to be painful. This is now a tendonitis — inflammation of the tendon. This is the best time to treat this condition. The longer a tendon remains inflamed and irritated the more change takes place at the tendon making it more difficult to resolve.

What are the signs of elbow tendonitis?

  • Stiff, achy elbow joint
  • Sharp elbow pain with lifting and gripping
  • Difficulty picking up your coffee cup
  • Difficulty with lifting especially with the arm out in front

How can you treat tendonitis at home?

  • Rrest the elbow.
  • Stretch the muscles of the forearm.
  • Massage the tendon where it inserts into the bone.
  • Perform eccentric or lengthening type exercises for the involved muscle group (1-2#).
  • Ice


Arm out in front. Bend hand toward ceiling.


Arm out in front. Bend hand toward floor


Arm out in front thumb to floor. Push hand away from body.


Massage tendon across side to side at elbow.


Start position. Slowly lower hand.


End position.

If you are unable to resolve the symptoms see your physical therapist for more detailed and focal treatment. Visit RI Limb Prosthetics, Orthotics And Physical Therapy

Self Assessment Yoga Style

Thanks for checking out our second post on Posture in the month of May.  Last week we told you what "optimal posture" would look like.  Today's article incorporates some self mobility, assessment and awareness to work on correcting your posture by sensing were you are in space.  Let us know how it feels when you get your self "stacked up right" (or is it "upright"!!!)

Standing Postural Assessment 2:

You can also check your posture by bringing awareness to your body. Give it a try on your own, or come see Erin at our yoga classes Tuesday at 8 AM or Thursday at 7:30 PM.

Moving up, stack your knees directly over your ankles. Then hips over your knees. Check in!

  • Do you have equal weight on each leg? 
  • Are you able keep muscles relaxed along the front and back of your legs?

Now, bring your attention to your tailbone and pelvis. Your center of gravity is located here. Tip your pelvis forward and backward a few times. Then, settle so your tailbone is pointing down towards the floor directly between your feet and your belly is tightened slightly like you are zipping up a pair of pants.

Continue by moving your attention up your spine stacking each vertebrae on top of one another. Now, turn your attention to your rib cage, gently rock forward and back a few times to feel gravity pull you in each direction.

  • Settle in the middle so your rib cage is stacked over your hips and you feel like your rib cage is floating effortlessly over your abdomen.

Bring your attention to your shoulders. Shift your shoulder blades up and down, forward and back, then in circles. Settle with your palms facing forward, your shoulder blades gently pinching and your chest opening.

Now move your attention up your neck, one segment at a time until you get to the base of your head. Gently tuck your chin so the crown of your head is reaching towards the ceiling and the base of your head is gently resting on the top of your neck.

Imagine yourself being pulled from the crown of the head along that "plumb line"  that we discussed in the previous post.

  • Lengthen out your body, reversing the effects of gravity. Stand tall and feel what it is like to draw awareness to your posture.

As always we hope the information is helpful in your daily pursuit of good health and improvements in mobility.